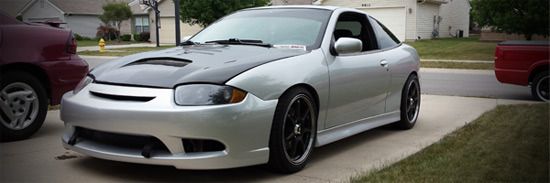
Okay, so you've got yourself a set of Toyota Cavalier taillights and now you need to hook them up. No problem. There are two parts to the install: physically installing the lights and then wiring them up.
Required:
* Toyota Cavalier taillights (obviously!)
* 16 gauge wire
* Wire stripper
* Solder/heat shrink tubing OR butt connectors
Install
Putting the lights on your car is a no-brainer, you take off the old lights and install the new ones. There are three nuts on each light.
Note that 95-99 Cavaliers and 00-02 Cavaliers don't have a centre filler piece between the lights, like the Sunfire sedans and the 03-05 Cavaliers do. If you're the lucky owner of the latter, you'll need an older trunk lid without the holes for that filler panel... or an applique like RK Sport sells to cover up the holes that removing that centre panel leaves. You'll know what I'm talking about when you look at the inside of your trunk lid.
My 2000 Cav came with speed nuts on both the inner and outer stock lights, and I imagine the 95-99 did as well. The 2000 Toyota outers use a 5mm threaded nut and bolt instead of a speed nut, so you'll need 6x 5mm nuts (along with some washers) in order to hold the lights in place. These are easily obtained at your local hardware store for pennies apiece - go to GM and you'll pay $2 per nut (if you WANT to they're part number 11514252 - I already made that mistake). The inners use speed nuts on both the Chevy and Toyota, so you can re-use your existing hardware.
Tip: My Toyota tails didn't come with a foam surround on the outers, and the rubber sealing ring (for lack of a better name) was too tall so the lights didn't sit flush. I moved the rubber and foam from my stock lights to the new lights before installing them.
Wiring
Wiring the lights isn't as easy as the install, but it's not really that difficult either - it just takes a little patience. There is no need to do any re-wiring on the inner (back up) lights, all you need to swap is the lamp housing. Wiring up the outer lights requires some modifications, though: You need to run a separate line for the amber turn signal, and re-wire the stock brake lights a bit. The stock wiring for the existing brake lamp will plug directly into the new lamp, but to make the lamp function the way it's supposed to, you should tie the brake lamps into the high stop (third) brake light so they don't come on with the turn signals.
For re-wiring the outers, there are two parts: the turn signals and the brake/marker lights. Your stock tails have one bulb that combines the brake, marker and signal functions. It uses two filaments to achieve this; the smaller filament is the marker lamp, the larger filament is the brake/signal. The Toyota tails have a separate bulb for the flasher and the brake light (though both are still dual-filament bulbs... you don't NEED a dual on the signal, but that's how mine came and I suspect yours did too).
Anyway, I digress.
The stock outer wiring has three wires: brown (marker lamps), black (ground) and yellow (driver's side) or green (passenger's side). The yellow or green wire is the combination wire. You can use this for the signal bulb, but it will also light up with the the brake UNLESS you cut off the brake signal to the multi-function switch on the steering column. Fortunately, this is very easy to do:
1. Remove the top cover of the steering column. (No bolts, just pull straight up)
2. Find the white wire at the end of the blue connector at the top of the multi-function switch.
3. Cut the white wire. Tape off both ends.
Now, you can connect the yellow wire (on the driver's side) and the green wire on the passenger's side) to the turn signal bulbs on your Toyota tails. On mine, they were light blue on each side. If yours is a different colour, so be it... just run it to one side of the turn signal bulb. The other wire (probably black) ties to the existing black wire on each side. That's ground. Ta da, you should have working signal lights now. (Now is a good time to check this).
Next, the brake lights. You cut the white wire going into the multi-function switch, so the yellow/green wires no longer receive the brake signal. No problem, you already have a brake light on the rear of your car that didn't flash with the signals - the third (high stop) brake light. There's two wires going to it, a white and a black. The black is ground, you don't need that... the white is your brake light. Run some new wire (preferably white, but it doesn't matter) from the third brake light to each side.
We're going to run new turn signal wires from the front of the car to use for the new turn signal only bulb. Then we're going to modify the existing wiring so that the old combination light still does the brakes and marker lights, but not the turn signals.
First off, the turn signals.
You need to run new wires for the turn signals from the existing lights at the front of the car. We want a +12V source that is on ONLY when the turn signal is on, not all the time like the combination marker/turn signal lights you find next to the headlights on the 95-99 models.
You can tap the light blue/dark blue wires that come off the signal switch itself, as they go into the instrument cluster, or at the front lights themselves. If you're doing side markers, you'll need these wires anyways. If you've already tapped wires for side markers, make sure they're the right wires before you simply extend them to the trunk.
If you're tapping into the wires in the dash, remove the dash and find them. It's easiest to tap them as they're going into the instrument cluster. If you want to tap them at the lights, use the blue wires. On the 2000+ models, it's right next to your headlights. On the 95-99 models, go for the lower bumper light. You will notice three wires going to the bulb holder: green, blue and black. The blue wires are the ones we are interested in, as these are the wires for the turn signals. Notice that there is a light blue wire on the driver's side, and a darker blue on the passenger side.
Run the new wires to the trunk of your car. You can run them together, but make sure you know which one is which! Connect the new wire to the blue wire on the new turn signal lamp. Solder or crimp - your choice. Connect the black wire on the new turn signal lamp to the black wire on your existing brake/tail lamp. Finally, test your new turn signals! You will notice the brake light is flashing with the signal at this point.
Next the brake lights.
The factory combination brake/turn taillights (you know, the ones for the Chevy taillights you USED to have?) use a single bulb with two filaments to perform three functions: marker lights, brake lights, and turn signals. The factory harness on the combination brake/turn lamp will plug directly into the brake lamp on the Toyota taillights, and your marker lights will coninute to work as they always did. However, that means your brake lamp will turn on and off when the turn signal is flashing (along with the amber turn signal!). If this is okay with you, you can skip this step - I did.. I found that the Toyota amber turn signals are so bright that I have left this wiring the same for now.
In order to make the brake lights work ONLY as brake lights (instead of flashing with the turn signal), you need to cut the yellow wires running to the brake lights on either side, and attach the lamp wires to the white wire on the third (or 'high stop') brake light. You can do this at the actual lights (and run some extra wire), or you can probe around a bit and find where these wires all run to the front of the car together (at the deepest part of the trunk, on the driver's side) and do the connections there. The other end of the wire (from the brake switch) can just be taped off.
There is one slight problem with the Toyota Cavalier taillights, and that has to do with clearance for changing the brake lamp: there isn't any. You need to actually remove the taillight every time you need to change the brake lamp bulb. Other than that, I love having unique taillights!
Enjoy your new taillights!
In order for the Toyota Taillights to function properly, you need to separate out the signal/brake light feeds. This is accomplished by cutting the brake switch feed to the turn signals and tapping into the brake light signal at the third brake light.
There are more complicated ways to wire the taillights (such as running signal lines from the front signal lights), but this is the easiest method:
Wiring Instructions
1. Pop off the steering column top cover. You may need to unscrew 3 t-25 torx head/7mm bolts under the steering wheel column to do this.
2. Locate the white wire on the turn signal switch harness. This is the feed from the brake switch, which tells the signals to flash on and off the brake light on each side. Do not confuse it with the gray cruise control wire. DOUBLE CHECK that it IS the brake wire by testing with a multimeter or a test light. It should have +12 volts when you press the brake pedal. Cut the white wire and tape it off. Give it an inch or so, just in case if you have to reconnect it in the future.
3. Reinstall the steering column cover.
4. In the trunk, either cut off the factory plug to the brake light, or pull the wires out of the plastic connector. You can solder the new connections or use butt connectors (your choice).
5. Rewire the plug as follows: the black wire (ground) goes to black, brown wire (marker lights +) goes to brown, yellow from car (left signal +) to light blue on Left tail, green from car (right signal +) to light blue on Right tail. (pic2)
6. Tap into the white wire(s) that go to the third brake light/high stop light on the spoiler or rear deck. If you don't have one, you should at least have the wiring for it under the rear deck. Using some extra wire, connect the white wire from the third brake light to the remaining wires: yellow on left tail, green on right tail. NOTE! Some 02 models (and possibly 03 models) should use the yellow 3rd brake light wire. DOUBLE CHECK the brake wires with a multimeter or test light first.
Now test everything!

13.1 @ 115