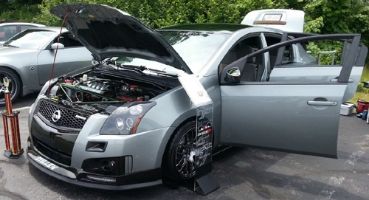
Before I my sideskirts were too short and the fronts were flush with the fender but not long enough to wrap around so they were held on by some mudflaps. My front and rear bumpers were both cracked so I decided it would be a perfect time to fix all of these problems before the next show season. I will post fix of it finished and painted, but here are some of the steps along the way.
This can be sort of a tutorial to those who have mis-fitting fiberglass pieces. Please let me know what the think of the work so far and any suggestions.
These two pictures are of my front bumper after I filled it and sanded it


Back of the front bumper were the crack was fiberglassed with resin and mat.

The next two are the back of the rear bumper were the crack was also fiberglassed with resin and mat.


This is a little idea I came up with to support the mounting area of the back bumper where the screws go in on the sides, I used a piece of galvanized steel with predrilled holes in it and fiberglassed it onto the lip for more structure. It will basically act as a washer would but will support the bodykit throughout were the metal is touching. instead of just were the 2 screws are. The extra fiberglass was obviously trimmed off lol.

First I cut the ends off of the skirts, the parts that would be in the way, then I sanded down the clear coat off of them to create a rouch surface for the fiberglass to bond to. Then I mounted the skirts were they would go and duct taped the fender behind it and any areas I didnt want resin and then formed a mold with a bunch of layers of duct tape were i would lay the new fiberglass.

These are some pictures with 2 layers of fiberglass mat and rezin. After these two coats I let them dry and removed them once i had my basic mold.


Here are my skirts removed, but not yet trimmed. I added another 3 layers of fiberglass mat, one layer on the ouside and two more on the inside of the mold for a flush fit.


Then after the next few coats of fiberglass I trimmed them down, and I drew a line where I think im probably going to trim them further, we will see, lol. Here are some pictures before the bondo body filler was added. Gives you an idea of what they will look like, I still need to trim some areas and add a little more glass.


-Nate (ZeeTwankyFo)

dang, looks like a lot of fun... nice work though.

sndsgood wrote:nice to see someone do a body kit the right way instead of just slapping on the parts the day they get them. seen so many poorly fitting kits from people not bothering to fit the parts up right.
Very true, small things are what set cars apart.
dirty elf wrote:sweet 
wut sides are those?
They are the AndysAutoSport.com Combat sideskirts.
-Nate (ZeeTwankyFo)

Good glass work man! Coming along nicely!

I cant WAIT to see it finished off with the repaired kit and whatever rims u end up choosing!


Nice work man, I just had to sand and fill my skirts myself to get them to fit right.. Glad yours is working out for ya..
~2014 New Z under the knife, same heart different body~
______________________
WHITECAVY no more
2012 numbers - 4SPD AUTOMATIC!!
328 HP
306 TQ
when you finish that up come do mine

<a href="http://www.cobaltss.net/forums//index.php?referrerid=37" target="new"><img src="http://registry.gmenthusiast.com/images/tgmtzmx/SatchmoeSigJBO.jpg"border="0"></a>
Man. What a PITA these kits are. Mine are on there, but after all the bumps and bounds they cracked from the stretch, so I have to do the same thing. It's worth it though. The Combat sides and front are hot, but I'm not a fan of the rear. I kept the front and sides, but I'm putting a trimmed down BC2 on the rear.
Looking good so far man!

Man i had to go through that same stuff. I seriously have about 35 hours on each side skirt just to make them fit perfectly. Then i fiberglasses bolts in the back and drilled trough my quater panel and fender to hold them babys up there. But it was all worth it in the end.. I will have some pics up probably tomorrow night. But good luck and its looking good man.. Later
Casey Hay
Good job man.
- Darren
<a target="_blank" href="http://phewes.snowpants.org/">
<img src="http://phewes.snowpants.org/sig2005.jpg" alt="get off my sig!!" width="368" height="116">
My Cars slower than your Car!! wrote:Man. What a PITA these kits are. Mine are on there, but after all the bumps and bounds they cracked from the stretch, so I have to do the same thing. It's worth it though. The Combat sides and front are hot, but I'm not a fan of the rear. I kept the front and sides, but I'm putting a trimmed down BC2 on the rear.
Looking good so far man!
PITA, tell me about it, lol. Oh well, it is so worth the sexiness

I am not 100% sold on the rear either but theres none that really match the rest of the kit, I like how it looks but it certainly could be better.
-Nate (ZeeTwankyFo)

i love the sig

I ain't callin u a gold digga,but you ain't messin wit a broke cracka
duct tape body kits are the new fad
QUICK.... EVERYONE TO WALMART
good luck on yer repairs man dont forget to post the finished product eventhough its gonna look like it did before lol
 Shush Weasel..i want my shirley temple
Nice work
Always loved the Andys kit.


