This is by no means an expert tutorial. This is the method I used to wrap several pieces of my interior with black vinyl. I hope it helps someone.
List of items you will need.
1. Vinyl (I picked up some marine vinyl at my local fabric store 5 square yards for $40. I had plenty left over.)
2. Glue Gun (With lots of sticks.)
3. Spray Adhesive (The parts store didn't have 3M so I used whatever they had in stock.)
4. Scissors
5. Rubbing Alchohol and a clean rag.
6. Marker
7. Bondo Spreader (It is what I used but I am sure you can use other items here.)
8. Time and Patience
First step would be to remove the pieces you want to wrap and lay them out. (For help on how to remove pieces and parts you can refer to the Haynes manual or search this site.)

Next take the rubbing alchohol and cleans the pieces real good or dirt and other debris. (This is an important step, because the vinyl will show the debris once it is wrapped.)
Next lay your piece face down onto the vinyl back and make an outline in the shape of your piece. Be sure to leave a few inches of slack all the way around just to be safe.

Next go to a well ventilated area and spray your adhesive on the face of your piece and the backing of the vinyl.

This next step can be a little tricky but pick up the piece and try to position it evenly onto the vinyl. From one end slide your hand over the vinyl and rubbing it to help promote the adhesion. If it is a flat surface you are ready for the next step. If you have a part that is somewhat curved (See pic below) then take your spreader and run it in the crease. This helps the vinyl follow the contours of the piece.

Next comes the fun part and by fun I mean time consuming. Now that you have the face covered its time to wrap it on the ends.

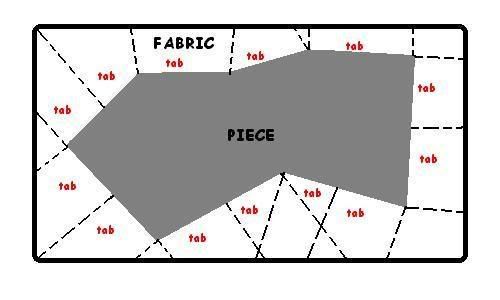
What I did was make cuts at every single bend in the piece. Also if there is a long stretch then make a cut every 3"-6". I didn't take a pic but I made a diagram of where i would've cut it.

After you make you first two cuts you will have what I call a 'tab' take your glue gun and apply glue on the back side of the piece in the size of your tab. Pull your 'tab' over and press firmly. Wait about 10 seconds then make your next cut then repeat. (Note: Do not cut up to the piece. Leave about a 1/4" space so that you won't see your cut lines on the side of the piece.) Also never ever ever ever apply the hot gun glue on the face of your piece the glue lines and bumps will show through.
Here is the finished product still awaiting to be reinstalled.
Backside

Face

nice work. been thinkin about redoing my driver side door since my seatbelt messed it up

Hey that looks like some quality work. Nice job.


2000 2200 Cavalier: 9/14/2000--10/23/2006
2007 G85 SS S/C: 10/23/2006--Present
Vote for me at
Motortopia.com! Thanks!
i'd prolly have issues w/the bigger pieces with more curves to them

try the top dash peice and get back to me im having a hell of a time getting it to stick in the middle
http://memimage.cardomain.net/member_images/10/web/2134000-2134999/2134641_3_thumb.jpg
Nice man. This was actually the next thing I was gonna do after I get done painting everything. Thanks alot.
Wide Body Progress

awesome. so does this also work on doing the carpet inserts in door with vinyll.

JBO'S Mr. 64.....
^^ it should, i wrapped mine in black carpet like 3 years ago.... a lil trick i found out is have a baseball handy for the armrest piece, it works that curved part great

hmm that looks awesome man, if i ever get things worked out with my car i think ill look into doing some of that myself. now, could i do that with, everything, dash, rear quarter trim...??
Some of the more complexly shaped pieces would be more difficult, but with patience it should all be doable, I'd think.

I wouldn't recommend using the lightweight spraycan adhesive. contact adhesive is what you should use. normally shot through a siphon feed paint gun with a 2.0 tip or bigger, but it can be applied with a roller as well.

Thanks a lot. This will be helpful.


