In an earlier post I went through the steps to remove the steering column. Since we are having some nasty weather I thought I'd go through some of my stuff and got the idea to make a posting of some of the guts inside your steering column. Hopefully one day I'll disassemble one and take the photo, but for now I'll just show some stuff.
Since you've pulled your column there is probably a darn good reason you went to all that trouble in the first place. Something must be broken. Here is some of the things inside and where they are!!
To start go to the auto store and get a couple of tools. 1st will be a steering wheel puller. Costs about $20 at autozone:

Once the wheel is off you'll run right into the steering lock plate. This is what locks up the steering wheel when you remove the key. You can't see anything special from the front:

But once you see the back side the idea becomes clear. There are a bunch slots around the circumference of the plate, a spring loaded pin is forced into the first one it locates once the key is turned all the way back. This is why sometimes you can turn the wheel just a little before it locks. Also, when the front wheels are feeding back force to the steering wheel, the pin is jammed against the sides of one of these slots and it is very hard to turn your key forward. Turning the steering wheel against this force centers the slot ant the pin can be drawn back down when turning the key forward.

Now comes the hard part. This lock plate is held in place by a little lock clip.

You can try pressing against the lock plate and try to remove that clip, but you will ruin the clip in the process. Here is the clip as it is supposed the be:

...and here is one all buggered up:

It isn't going to fit in the groove and it isn't going to hold down that lock plate correctly. This plate works with the horn connection ring and needs to be correctly in place. Here is a shot of the good and bad clip together:

The best solution is to get the lock plate removal tool. One cost about $25 at Advance Auto.
The bolt is in the stored position in the photo. When in use the bolt is turned around, one of the socket looking pieces it screwed on the threads where the steering wheel bolt is screwed on, then the bolt screwed into the forks and screwed into the socket. Next as you turn the head of the bolt, the forks will apply pressure and push the lock plate away from the clip. You'll need a punch and a couple of small flat blade screw drivers to carefully work the clip out of its groove and up off the column. Take your time here. Patience is a virtue!!

...........................................................................


Now that the lock plate is off you next see the horn connection ring. this is what it looks like. There will be different kinds and colors depending on the type of steering wheel you have. This allows you to press on the horn button and make contact to the horn relay via the turn signal switch. ...and it does it all 360 degrees of course!! :-)

There are differences on the backside as well too.That copper ring is what connects the turn signal switch.

When the time comes to replace the steering wheel. Take a few minutes to carefully position the wheel on the column and the connection ring. These can turn independently, and if not just right will easily break off your riser the steering wheel horn button connects too!! Yep...speaking from experience!!

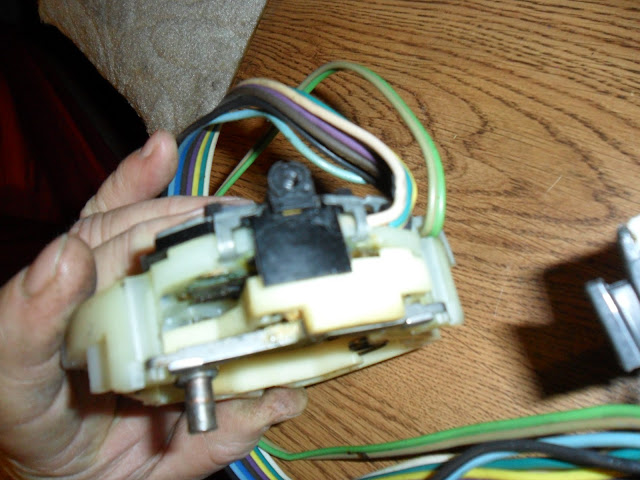
Now you can see the turn signal switch. The ignition key lock has to be removed to get this off. Unfortunately I don't have any photos of that part at this time. One screw or bolt comes out and the lock can be removed if it is in the Run Position. Hope you have a key. I can't remember the details if there is no key. Once the lock is out of the way there is 3 screws or bolts that hold the turn signal switch in place. You will have to turn the switch in the left and right turn positions to gain access to the bolts / screws. I gonna say here , that whoever designed this switch had to be a genius. How anyone ever come up with a design like this is beyond me. One thing is for sure, if the world was waiting on me for this they'd still be hanging their arm out the window!! This device makes contact for the right and left signals. Power first goes through the blinker switch before going through the switch, that is why you only have one blinker switch for both left and right.

This also has the hazard flasher switch on it too, so if you are having trouble with your hazard flasher, you have to replace this too.
The hazard switch is the black part here. That copper pin sticking down is what connects to the horn connection ring...so ...yep you know what is coming - this can also be a problem if the horn doesn't work if you have checked out the horn itself, horn button, horn relay, and fuse of course.

Now we get deep , deep, deep...echo echo echo....inside the column. At this point you have to take entire column out and work on a bench. There is only a few reasons to do so. Column is tilt and the tilt mechanism is loose. Possible bearing issues. Last one would be the dreaded windshield wiper switch. Yes if you are suffering windshield wiper switch issues, be afraid....be Very Afraid...loL. No if you take your time and are methodical you can this this one too. You will need to remove the complete housing off the column. You column will look surprisingly naked by now, so might want to cover it up to make it feel better. Since there are tilt and standard columns and I have both here is a side by side. The shorty is the tilt.

Here is a shot of the W/W Switch for what would be the bottom of the column looking up.Also note the tilt uses a pin while the standard uses a special bolt for mounting.


I have the tilt out so here is a better shot of that one.

And Finally all out: Sadly I don't think tilt and standard can be swapped. Also the pink jumper cable is a clue - it designates it is to a interval wiper switch.

...and here is the plug without the jumper - standard on/ off curse in the mist wipers...LoL (again speaking from experience)
Also , amazingly, the stock under the dash -to-wiper motor Wiring Harness WILL support swapping to interval wipers, but you will have to get the wiper motor with the rectangular box on the from of it.

...........................................................................


Just to let you know you do not have to reemove the ignition to remove that turn signal interfce. I replacd my a year ago. You can still buy them new. I went through two till I got a good working one from autozone. I would suggest replacing it while you are there. The contacts burn/ wear out.

On the inside my car looks like a fighter jet.
Lastly I'll describe what is at the bottom of the column. Down there is the ignition switch and the Light Dimmer switch.
Here is the location of these 2 switches. You won't even need to remove the Steering Wheel, but you will need to drop the steering column and really ought to pull it away from the pinion coupler to gain best access. Here they are.

...and here is a better view. The Dimmer switch "Piggybacks' on the ignition switch. Both are actuated by rods driven from the key lock and the turn signal stalk. Simply there is a stud that has a nut to the ignition switch and then another nut that holds down the Dimmer switch on top of that. Replacing the Dimmer switch doesn't get the Ignition Switch out of alignment. Replacement the ignition switch gets both out of alignment. It is best to make sure both are adjusted correctly and working correctly before bolting everything back up. Saves you lots of time and frustration!! Also Ignition switches are different between tilt and standard columns. I have seen instances where I thought the ignition switch was going bad to just discover it had gotten loose and had worked itself out of alignment - try that solution before running to the store!!

This is the Dimmer.

And that is just about all the pieces inside your 1st gen J! I have found no differences between makes, but there are differences between years on the ignition switches. Any column should swap across all the different 1st Gen J's
............................................................................


Yep, Rob, I got that one bass ackwards, sorry 'bout that.
Thanks for getting me straight!!

.........................................................................


Usefull memories for me.I have already fixed the horn parts,and even my signal pieces(spring broke) inside housing and signal would stay on unless I moved it back.As for the rest it is all pieces I have handled in the junkyard removing items.I feel as tho I have had a refresher on the subject.Good details and for those who had not ventured here this should help no question.

REALLY good info Orlen!
It will make it a lot easier to replace my dimmer switch with this info. By the way I got my locking plate removal tool today in the mail. Was at my local Auto Zone yesterday and they had it on the shelf for $1.00 more than I paid for it on ebay.

good info orlen. i have a finicky turn/wiper/cruise/ switch i would like to replace. the wiper will go on sometimes when i use the turn signal and the cruise doesn't work at all. i took the wheel off and the locking plate (i have both of the tools) took a look around and thought i better leave well enough alone. now i might take another go at it. the wealth of info from the people on this sight just amazes me. please don't go anywhere guys i have two cars to restore and i'll be needing more help i'm sure!
Just popping a revive for a member on the 2nd gen forum to share.Either way no body lose's as even I need some refreshing on work done in the past.


