Well I figure ill throw up a few pics of my finished exhaust ports to see what everyone thinks. There is a ton of material that can be removed on the exhaust side. I worked primarily on the port itself (gasket match), removing the brutal casting ridges and smoothing everything out to a mirror like finnish. I was originally going to use an air grinder but because the exhaust ports are really small I thought with an air grinder I would end up removing too much material, therefore I used a dremmel. This represents about 25 hours, I took my time, I have done heads before in the past and there is no reason for me to rush since its for a personal project. One thing I spent allot of time on was the inside radius. You cant see it but on the eco head the edge is VERY sharp and needs to be smoothed down. I doubt it is even done on the Patriot head. You would have to do it by hand and it takes some time.
There are 2 things I chose to do that may be a little out of the ordinary:
1) I did a complete gasket match on the exhaust side. The reason I did this is because I will be fabricating my own Long Tube header and I will be fab'ing my own ant-reversion chambers in the header. Normally you wouldn't want a perfect match to combat reversion.
2) I chose not to knife edge the exhaust merge. The reason being is that I really don't trust the integrity of these "styrofoam" looking heads. The metal in my opinion is very porous and would be liable to chip when super heated. Thats more an opinion. I am looking for longevity out of this build. This is the same reason I am going with a 3 angle valve job rather than a 5: I want it to last and not wear in 20,000km.
I will still polish the ports a little more but I am 95% done. I will flow bench the head next summer durring my N/A build.
On to the PICS:
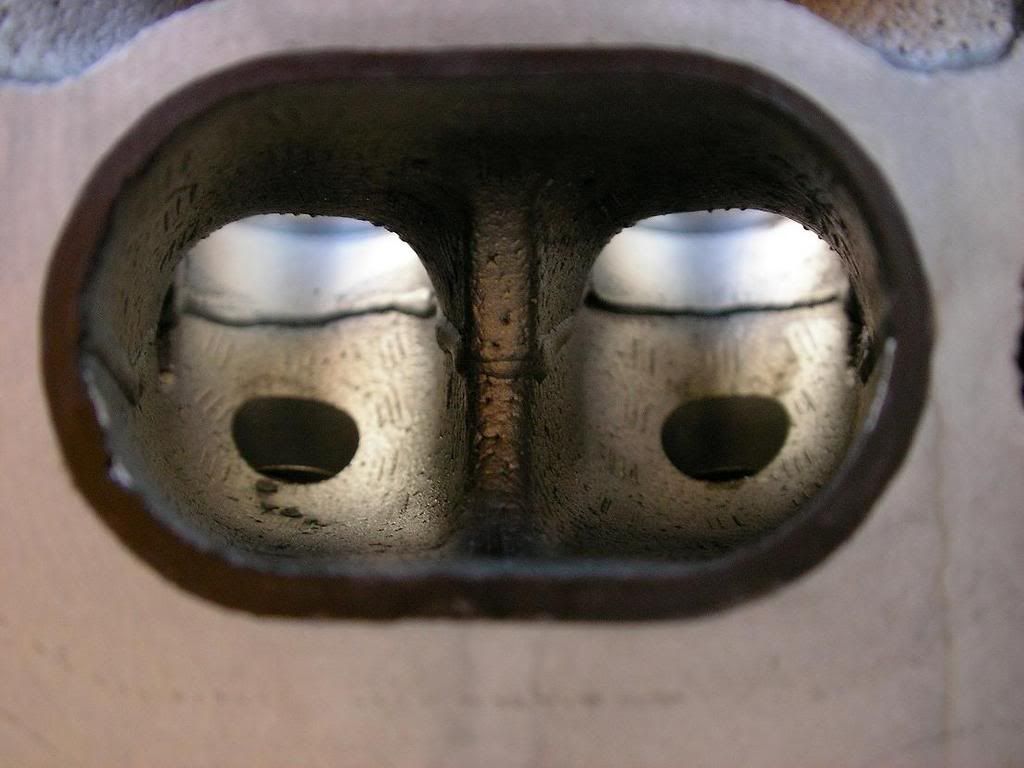
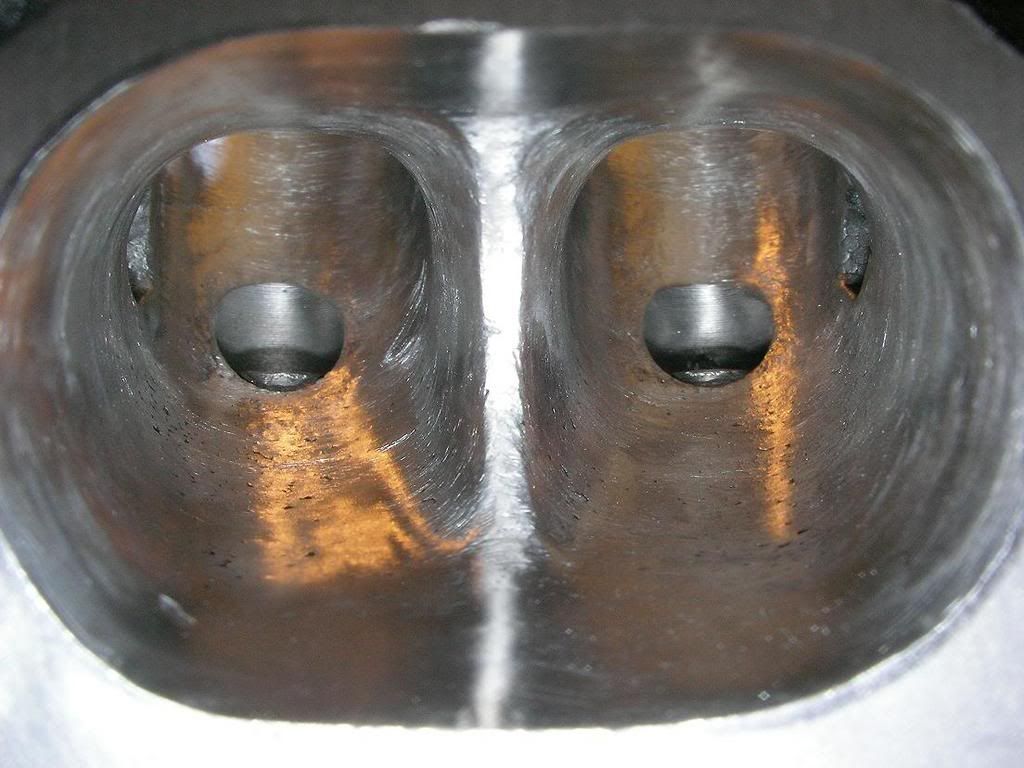
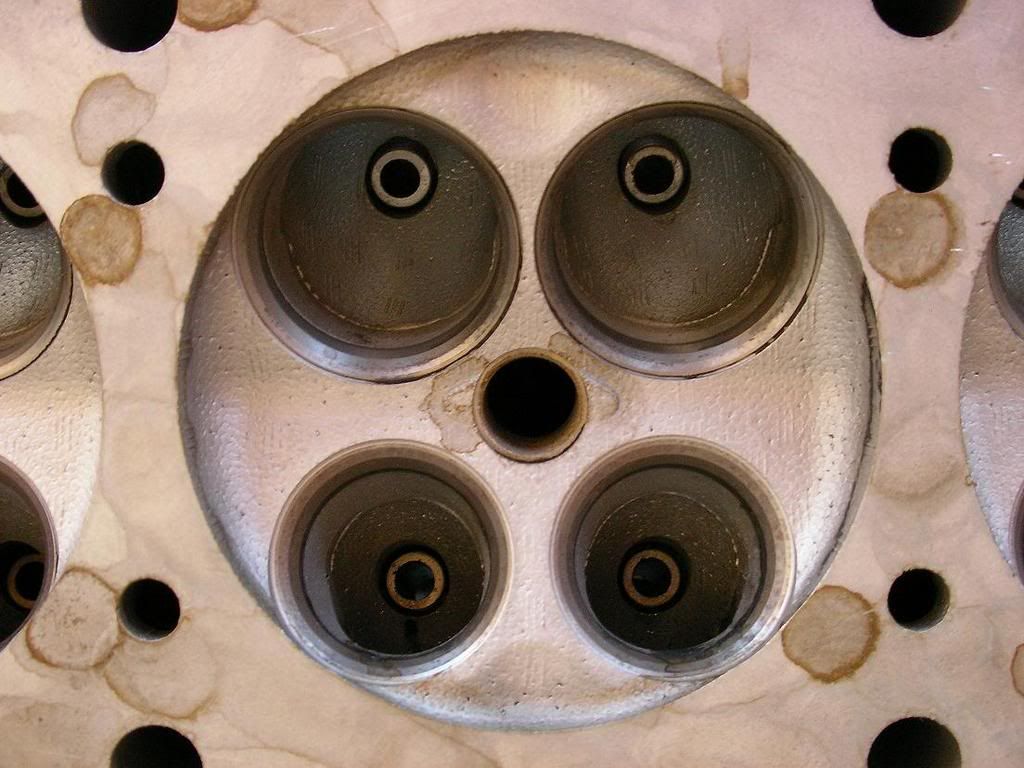
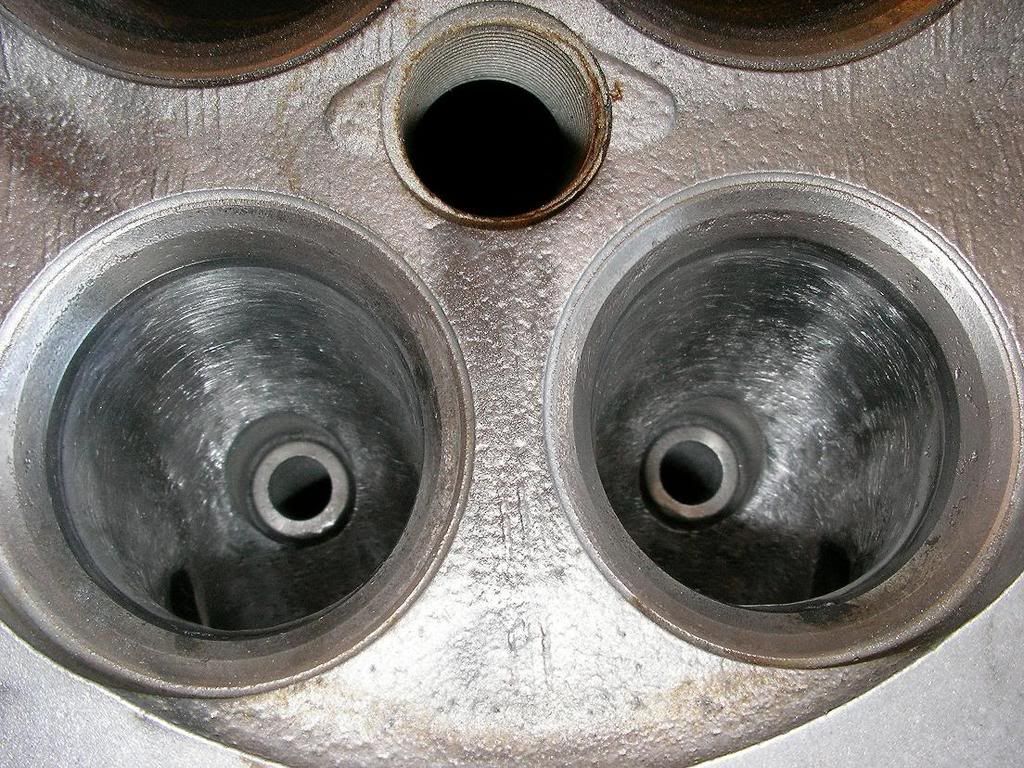
By the way, I still stand behind my original statement: Anyone can port and polish thier head at home. Unless you are trying to re-engineer the head itself (I wasnt) you can get great gains for the cost of materials and 25 hours out of your life.

"Go Before Show Yo."
CARCUSTOMS.NET, THE BEST SERVICE ON THE ORG!!!
Nice, I was thinking about doing this to a Junk yard head to see how it comes out. Have any pointers? What type of tools did you use?

Quote:
Have any pointers? What type of tools did you use?
I started off with an air grinder but it seemed like I could blow through a water passage and not even know it. I ended up using an electric dremmel tool with the "pen" extention. I bought a set of attachments and basicly worked through the different sanding barels and grinding stones until I found a good combination. If this is the first head youve ever done go buy a head from the scrap yard that threw a valve or a piston. They would probably even give it to you. Then experiment on the garbage head, when you find a combination that works move on to your "good" head.
This is a really good article:
http://www.sa-motorsports.com/diyport.aspx
Edited 1 time(s). Last edited Thursday, November 01, 2007 2:11 PM

"Go Before Show Yo."
CARCUSTOMS.NET, THE BEST SERVICE ON THE ORG!!!
Looks really good ive been working on mine with the dremel only have 1 an exhaust and 1 Intake and i have at least 5 hours in that. Take alot of time but i also think anybody can do it at home with some time. I got 2 heads so no worries on messing up they were free from work.

Quote:
Looks really good ive been working on mine with the dremel only have 1 an exhaust and 1 Intake and i have at least 5 hours in that.
Sounds like your on pace with how fast I worked. Good Luck!

"Go Before Show Yo."
CARCUSTOMS.NET, THE BEST SERVICE ON THE ORG!!!
Nice man.
At first I was questioning what the heck you were doing on the exact points you covered in your explinations below, and with those answers in mind, I agree, that casting does look very suspect to knife edge the divider. On a lost foam head, I wouldn't have even blinked, but this casting job looks to be one of the worst I've ever seen.
Port matching I was gonna kill you on. But again, your going to work with anti reversion in the headers so its not too too bad. You can go too large though what is the diameter?
I have been thinking about doing this. I got the tools from work to port and clean up my HO intake mani and realized I had what I needed to do a head p&p job. So I just need a spare head.
The I got the Standard Abrasives basic porting kit and bought some stones separate. It comes with the same instructions provided on their web site, listed a few posts up. They claim something like 15 hp on an average port job. Although that was on a V8 i am assuming, because all their illustrations are of V8's.
I have a question, how do you do the area around/ under the valves? Did you remove material or just polish it? I was just going to leave it alone so I don't F it up.
Also how do you know how far to open up the exhaust ports? I know there should be a step from the head to the header, but how much? Or is it best to just polish that and maybe take some material out inside the ports?
Looks awesome.
PSN ID: Phatchance249
Well. There are a lot of things that determine the answers here..
But. Yes the 15 horse they describe is for a larger displacment motor, but it all depends on how good/bad your port job is an how bad the head(s) are to begin with... ( Obviously)
the area under the valves you are talking about is the Valve throat. This area is critical.
Remove little material here, also when doing the short side radius ( the roof of the port ) again, remove little material. Reason being the increase in port volume will not be useful with lower velocities here.
Don't gasket match the exhaust.
Sorry, kinda busy can't wanna respond at the moment
WOW!!!! VERY NICE WORK!!!!!
i would knife edge the splitters though, unless u have? im drunk...

Quote:
Port matching I was gonna kill you on. But again, your going to work with anti reversion in the headers so its not too too bad. You can go too large though what is the diameter?
The head is at the machine shop right now and its been a few days so I cant remember the exact measurements, basicly the black outline I put on the port was around what I ended up taking off, but I only used it for a guide. I then measured and cut the first 1 inch with a carbide cutting tool. I blended everything with a set of grinding stones and a dremmel. I went up to 1500 grit on the inside radius and polished al the sharp edges out. When I get the head back ill post up some measurements. The header im going to build will be making most of the power in my set-up. I think manifolding for N/A power is key.
Quote:
I have a question, how do you do the area around/ under the valves? Did you remove material or just polish it? I was just going to leave it alone so I don't F it up.
The valve bowl itself you need to be very careful with. I removed a very small amount with a grinding stone and a dremmel then I focused on blending the area together. If you look at picture #3 above, there is a very large casting ridge as well there are some very sharp edges from where the machined surface (where they cut the valve) to the cast surface. The goal here is to make everything smooth. You should aproach it in the way that you want to remove as little material as possible to make the transtion smooth. The inside radius which is the roof of the port is really hard to get to with a tool. I used a very soft blue grinding stone to remove the sharp edge (you can feel it with your finger) and then I buffed it out with 300, 800, and 1500 grit paper. It will take a long time. As far as how much material you want to leave I have heard that a minimum to stop reversion is 1mm.... but there is alot of debate as to wether reversion even effects gross hp. Basicly unless you are prepared to hand make a header (which is what im doing) leave at least 1mm smaller than the gasket.
Quote:
WOW!!!! VERY NICE WORK!!!!!
i would knife edge the splitters though, unless u have? im drunk...
No didnt knife edge it. I went over the reasons in the first post. I dont think the casting would have been able to propperly hold to gether if knife edged (just my opinion). Thanks for the compliments.

"Go Before Show Yo."
CARCUSTOMS.NET, THE BEST SERVICE ON THE ORG!!!
you certainly spent some time on those ports, but as you say 'why rush'
there are a few pics of my diy ported head in this link............
here
Quote:
you certainly spent some time on those ports, but as you say 'why rush'
there are a few pics of my diy ported head in this link............ here
Wow! lookin' good!
Is that a 2L head or a 2.2L head? You did a good job regardless. I heard though that the 2L head is a little better put together, bigger ports out of the box and a better casting overall.
Looks really nice though good luck with the build.

"Go Before Show Yo."
CARCUSTOMS.NET, THE BEST SERVICE ON THE ORG!!!
it's an ecotec 2.2 same as yours.
I ported the head a few years back, fitted sivalves +1mm waisted stem valves too.
The 2.4 vvt inlet manifold port matched works very well.
I finally had the ecu remapped a couple of months ago, flywheel power was 215 bhp - normally aspirated.
Quote:
it's an ecotec 2.2 same as yours.
I ported the head a few years back, fitted sivalves +1mm waisted stem valves too.
The 2.4 vvt inlet manifold port matched works very well.
I finally had the ecu remapped a couple of months ago, flywheel power was 215 bhp - normally aspirated.
Oh yeah, I remember your post about that. Im going to be doing a similar head except I am doing the GM performance parts valve trail. 1mm over also.
I have a question though. The intake side on these heads are really big as a proportion to the exhaust side. Did you open the intake side up more? If so what was your reasoning? I am going to leave the intake side near stock. I am going to fab my own intake manifold from scratch. I have already gotten the flange cut as a perfect mathc to the standard port.
Also do you have listed somewhere a complete mod list and your dyno chart? Id really like to see it.

"Go Before Show Yo."
CARCUSTOMS.NET, THE BEST SERVICE ON THE ORG!!!
all I did was open them slightly to match the opening, the inlets are big enough and I did not want them any bigger, the throat area needs rounding off, I removed about 1/8" from the radius, you can just make it out in the pics.
my 2.2 ecotec's full spec is half way down this thread....
here
the dyno chart is later in the same thread ....
here
to be honest the 2.4 vvt inlet (port matched) will take some beating, especially as it's so cheap.
Nice build! Who makes your 68mm tb? Also is it verified at 68mm if its a bored unit?

"Go Before Show Yo."
CARCUSTOMS.NET, THE BEST SERVICE ON THE ORG!!!
Hey, I was thinking about doing that. I'm gonna try to get a junked one if there are any in my nearest junk yard, or just grab one from ebay and work on that. So it is possible to do the whole job with an electric dremel? Good to know especially since I practiced on one of my scrapped screwdrivers and the dremel ate right through the thing in ten minutes. I'm sure it can take it with the right bits. Any ideas about an angled valve job and whether it's possible to do by hand?
Gameoverracing. wrote:Nice build! Who makes your 68mm tb? Also is it verified at 68mm if its a bored unit?
it's the standard 2.0sc 68mm electonic throttle body, ported and the screws replaced with flush fitting ones on the butterfly spindle.
the european 2.2 ecotec's are all electronic throttle, the 2.0 sc tb requires a few wires to be swappped around, but it has worked well for the last few years.
Quote:
Hey, I was thinking about doing that. I'm gonna try to get a junked one if there are any in my nearest junk yard, or just grab one from ebay and work on that. So it is possible to do the whole job with an electric dremel?
Yes, thats what I used but you need to really take your time.
Quote:
Any ideas about an angled valve job and whether it's possible to do by hand?
For the valve job you will have to take it in to a Machinist.
Quote:
it's the standard 2.0sc 68mm electonic throttle body, ported and the screws replaced with flush fitting ones on the butterfly spindle.
the european 2.2 ecotec's are all electronic throttle, the 2.0 sc tb requires a few wires to be swappped around, but it has worked well for the last few years.
Thanks for the info! Drive by wire, I guess the european market demands more.....

"Go Before Show Yo."
CARCUSTOMS.NET, THE BEST SERVICE ON THE ORG!!!


